Guitar: Lesson 2
Basic Right Hand Linear Technique
By Zack Cart
Prerequisites:
You should be able to understand and perform the concepts and techniques outlined in the following lessons before attempting this lesson:
Guitar: Lesson 1 - Basic Geography
Music Theory: Lesson 1 - Twelve Note Division of the Octave
Music Theory: Lesson 2 - Notation of the Seven Basic Notes
Music Theory: Lesson 3 - All Twelve Pitches - Modying the Natural Notes
--------------------------------------------------------------------------------------------------
Now that we can all tune our guitars flawlessly, we will proceed to begin to develop some rudimentary technique with the right hand.
-----------------------------------------------------------------------------------------------------------------
A note on Plectrum/Pick styles as opposed to Fingerstyles. Playing with a pick lends itself to playing single notes swiftly along a string, and to strumming. It can also be used toplay multiple notes simultaneously, and to play notes which rapidly switch strings. Playing with a pick lends itself to all this and many more unusual and exotic techniques and variants, and surpasses the functionality of the pick in all aspects except for single note melodic playing along a single string.
The choice is yours. With a focus on plectrum technique, you can play faster melodies with less practice. With a focus on fingerstyle technique, you can do everything, but these melodies will be more challenging toplay quickly. Due to the increased versatility of fingerstyle gutiar, we will focus on it first. It will remain our primary focus, although plectrum technique will also be explored in later lessons.
A further choice, given that we will be examining fingerstyles, is your picking/plucking surface.
Many players will choose to just use the fleshy fingertips, for a gentle, soft sound. Be warned though, this will be the option which results in the slowest playing speeds, and will sound muddy on nylon strings.
Some players will choose fingerpicks. These are small picks which slide over the tips of your fingers, with an additional pick which loops over the thumb. Through the use of them, you will gain speed and clarity of your notes. Unfortunately, these will drastically limit the techniques available to you, and may also fall off if certain techniques are attempted.
The final option is to use your nails. Playing with nails, you retain all the versatility of fingerstyle playing, and also gain the clarity of fingerpicks. The only downside is that you must maintain these nails, keeping them between a 16th and an 8th of an inch long, shaped into slightly rounded points, and intact. Though the ultimate choice ffrom a playing viewpoint, nail maintainance may prove to be too much for some players with weak nails, active lifestyles, or an inattention to hand movement. (A side note: I play primarily with my nails, which are usually about a 16th of an inch. I also practice and teach martial arts, work on antique cars, and enjoy many outdoor activities, such as kayaking, climbing, hiking... I do have naturally hefty nails, but nevertheless, breakages are few and far between. The lesson being, if you want to play with nails, you can likely do it!)
-----------------------------------------------------------------------------------------------------------------
The first right hand technique we are going to learn has many variations, and exponentially more uses. It is the basic technique for playing single note melodies. The object of this technique is to perform a melody- only one note will be played at any one time. At the moment we will ignore (neglect) the left hand, and utilize only open strings for our practice.
The technique is simple. First, while seated, position the guitar on either your right or left leg. Whichever leg you find to be more comfortable you should elevate slightly, either by placing the foot on a small box or stool, or possibly on the bottom rung of your chair. There are benefiets and costs associated with both positions, which we will examine in later lessons. With your left hand, merely provide gentle support to the neck for now, to prevent unwanted wobbling. Leave the frets alone; one thing at a time!
Place your right forearm against the body, so that the hand will hang naturally at the level of the strings, near the sound hole. The right hand and wrist should be held as loose as possible, allowing the fingers to dangle in their natural, curved-inward position. Further adjust your arm, so that the forearm is parallel to the faceof the body, and the angle of the forearm to the strings is between 45 and 90 degrees.
-----------------------------------------------------------------------------------------------------------------
Now that we are comfortable and completely loose, we will begin. Remember, remain LOOSE throughout all your playing. If cramping, pain, tenseness, or anything else occurs, relax, stretch your wrists, and take a break. If you over-work your hands and wrists with practice, you will only damage your future playing abilities!
-----------------------------------------------------------------------------------------------------------------
Place your middle finger below the low E string, but not quite in contact with it. The finger should here be only slightly extended from its natural curved position.
With a little bit of an extra push, allow the finger to relax back into its natural position, where it hangs loos from the hand. as it moves, your picking surface should just contact the string enough to pluck it, causing the note to ring out. This movement should be very natural, only assited by conscious muscle enough to make the string ring clearly.
Repeat this movement with your pointer finger; extend below the string but don't touch, relax back, passing through the string, with just a touch of added muscle behind the motion.
Now back to the middle finger. Now the pointer, now the middle. Pointer. Middle. Pointer. The fingers should alternate strictly back and forth. Make certain you never use the same finger twice in a row.
Keep these motions slow and controled, focusing on moving each finger perfectly. Don't try to get any speed or rhythm going for the first session, just strive for relaxed, comfortable technique, and a clear sound from the string. Practice playing notes with this technique on all six strings.
Spend at least a full practice session at this stage.
-----------------------------------------------------------------------------------------------------------------
Once you have spent enough time practicing the individual movements, it is time to focus on timing. If you have a metronome, good. If you don't there are many online metronomes to be found through a simple search engine with a search tag such as "online metronome." Set the metronome to a tempo (number of beats or pulses per minute) in the vicinity of 75.
Try to play one note on each click of the metronome, always utilizing the good technique you have learned, and staying loose. LOOSE!
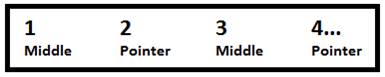
If you are having any trouble keeping up, slow the metronome down a bit, to 60 beats per minute, or whatever tempo you find comfortable. Once you find this comfortable tempo, just play notes, alternating fingers, staying loose, using good technique. Spend at least five minutes here.
Now, step the tempo up a bit, perhaps 10 BPM (beats per minute) more. The new tempo should still be comfortable, but slightly more challenging.
Keep doing this in your next few practice sessions until you can play comfortably and accurately in time with the metronome at a tempo of 120, with minimal mistakes, and a loose, easy playing technique.
-----------------------------------------------------------------------------------------------------------------
The final stage of this technique is to divide the beats, or clicks of the metronome into smaller, faster units. We sould already be able to play 120 notes per minute, comfortably and accurately.
Set your metronome at a slow tempo, perhaps 60BPM. Now, try to play twice as many notes as there are clicks. Every click, you will play a note with your middle finger. Even spacedbetween the click, try to play a note with your pointer finger. The notes should all remain as evenly spaced as they were when synced completely to metronome clicks. As before, keep working the tempo faster and faster, while keeping the technique comfortable and accurate.

Once you become comfortable with this at a reasonable tempo, perhaps 90 BPM, attempt to play four notes per click! This time, your middle will play on each click, followed by your pointer, middle, and pointer, all playing before the next click, evenly spaced. Again, start at a slow tempo in the vicinity of 45 or 50 BPM and work your way faster.

Finally, you should repeat the same division of the the click (beat) by three. This will be more difficult, mentally, as the finger which plays on the click will alternate. You will play evenly spaced notes: middle on the first click, pointer and middle following before the next click. When that next click arrives, the pattern will be reversed: pointer on the click, followed by middle and then pointer, before arriving at the next click, which will be back to the first pattern. Again, start slow, around 50 BPM and gradually work towards comfort at faster tempos.

-----------------------------------------------------------------------------------------------------------------
In the next lesson, we will focus on left hand single note technique in conjunction with this right hand technique, so make sure you learn it well!