Guitar: Lesson 1
Basic Geography
By Zack Cart
The guitar is an incredibly versatile, varied, and pervasive instrument in music from around the world. There are classical guitars, steel-string rock guitars, electric guitars, flamenco guitars, resonator guitars, twelve string guitars, slide guitars, endless forms and shapes, all used in different ways, for different styles. Beyond varieties of guitar, there are endless genres in which they are used, each with many differing playing styles. Sabicas, a famous Flamenco, is remembered as saying that the only consistent thing about guitar playing, is that everyone must find their own way to play it. He wasn't far off the mark, either. What works for one person in a certain style may be totally inadequate, overblown, or just wrong for someone in the same style, while two people in very different styles, may yet play with quite similar technique.
That being said, what I'll try to do here is to present some basic, ubiquitous elements of guitar-knowledge, and then spread out in various directions from there. In this first lesson, we will cover the most common, basic elements of the guitar, and then learn how to tune the guitar with two different methods. Please, try to learn and understand each portion of the lesson before moving onward!
If you have not read the first two theory lessons on this site, Music Theory: Lesson 1 - Basic Twelve Note Division of the Octave, and Music Theory: Lesson Two - Notation of the Seven Basic Pitches, you may want to do so now. If what is presented there is old hat to you, carry on, but if you find it confusing, please study that material before continuing here in the guitar section.
First off, some very general terminology, just to make sure we all know what we're talking about:
The "body" of the guitar is the large, resonating chamber. It is the biggest part of the guitar, hollow, and is where the sound is acoustically amplified (except in purely electric models, where it is solid)
The "neck" is the long, thin extension from the body, where the left hand does it's business.
The "head" is the chunky thing at the other end of the neck from the body.
The "strings" are the tensioned wiry strings, strangely enough which the length of the neck, from the head to the body. When displaced, these vibrate, producing the sound, or notes of the guitar.
The "frets" are the small metal bars which dissect the neck. By pressing the strings against these, you change their length and thus the frequency (note, pitch) at which the vibrate. The pitches created by "fretting" the strings in this manner are called "fretted notes."
The "fretboard" is the flat face of the neck on which the frets are located.
The "tuning pegs" and "machine heads" are the peg-like extensions on the head to which the strings are anchored, which can be turned to tighten and loosen the strings, creating the desired note or pitch for each string.
The "bridge" is the anchor at the other end of the strings, located on the body.
The "sound hole" is the opening in the body, directly under the strings, into which the displaced air from the strings travels, reverberates around the body, and is expelled, louder.
In electric models, the pickups replace the sound hole, and are generally raised metallic components on the body, located under the strings. They transmit electro-magnetically, the vibration frequency of the strings to an electronic amplifier, from where the tone is produced.
That should be enough basic layout to get us started, but there is one more bit of terminology I always instill in students in the first lesson. "Up" no longer means, "away from the ground, towards the sky." It now means, "higher in pitch." Thus, "to move up a fret" means to move from a lower pitched fret to the adjacent higher fret. "To move up a string" means to move from a lower pitched string to a higher pitched one, not I repeat NOT from a spatially lower string, to a spatially higher string. If I had a dollar for every time I've instructed someone to "jump up to the next string" and watched them jump to a lower-pitched string, farther from the floor... "UP" and "DOWN" are pitch designations in music speak, NOT spatial designations!
__________________________________________________________________________
Now, on to the strings themselves. In a standard guitar, there are six of them, each of which should play a certain pitch when played "open," or without being fretted.
The lowest (biggest, farthest from the floor) is tuned to E natural, just below the bass clef.
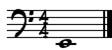
The next is tuned to A natural, bottom space of the bass clef.
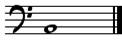
Next is D natural, middle line, bass clef.
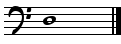
Then G, top space, bass clef.
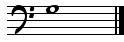
Now B, just above the bass clef.
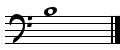
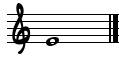
Finally, the top string (smallest, closest to the floor), another E, bottom line of the treble clef.
Since you are all familiar with the material in the first two theory lessons, you should have no trouble finding these notes on the piano. Having done so, you may commence tuning your guitar.
For now, we'll use a basic playing position, common to informal, or non-classical traditions. We'll get into other options later, but this is an easy, comfortable starting point. Sitting on a comfortable surface, a chair or stool which does not have arms which will interfere with your arms or the guitar, place the guitar body edgewise on your leg, with the back of the body tucked up against your stomach. The neck should be pointing off to your left. Use your right elbow area to gently hold the guitar in place against you.
Play the E below the bass clef on your keyboard, and try to hold that pitch in your head. Now pluck your Low E String with your right hand. Don't worry about technique for now, we'll get there later! Try to figure out if the guitar string is higher or lower than the keyboard note. By turning the E strings corresponding tuning peg, you can raise and lower the pitch. When you think you may be close, play both notes together. If they sound almost like a single pitch, you've done a good job! If not, try again. Piano note, guitar note, tuning peg. Play them simultaneously again. Repeat this pattern until the notes match, then continue on to the A string.
Play the A on the bottom line of the Bass Clef on Piano. Now, play your open A string. If the notes match, you're all set. If not, repeat the same procedure as used for the Low E string.
Continuing on up (towards the floor) through the other strings, simply follow the same procedure. If your guitar was very badly out of tune to begin with, or if you did a lot of adjusting to the strings, you may have to tune it twice, as changing the tuning/tension of one string mildly affects the others as well.
Now, you will not always have access to a keyboard, when tuning your guitar. There is another very simple method for tuning which is useable in such a situation. Stay away from electronic tuners whenever possible. The are finicky, often imprecise, and most of all, they rob you of an excellent opportunity to train your ears, replacing skill and practice with electronic complacence and laziness.
This method works best if you can hear a low E note from some source, either another musician in the room, or some instrument or noise maker. Tuning forks and pipes are products made for this use. Tune your low E string to that with the same process as before. If no E note is available, and you are playing alone, just make your best guess at where to tune the E and proceed from there. This is not ideal, but is perfectly workable for solo practice/playing.
Now, press down the tuned low E string between the fourth and fifth frets, slightly closer to the fifth fret. (counting from the head-end of the neck) Do this by squeezing the string and neck between your thumb and middle finger of the left hand, with the fingertip on the string, pushing against the fretboard and the thumb in the middle of the back of the neck. This is known as fretting the guitar on the fifth fret; whichever fret is just to the body-end of your fretting finger is the fret upon which you are fretting. thus, between the seventh and eight frets, you are fretting the eighth fret. To fret the guitar, you always press just to the head-end of the neck from the fret, never on top of the fret.
So, as we are fretting the E string on the fifth fret, pluck the string with a finger on the right hand. This note will be the A on the bottom of the bass clef, the note needed to tune your A string. With this knowledge, you should be able to follow a similar procedure to that already detailed for tuning to piano, and tune the A string.
Once tuned, the A string can be fretted on the fifth fret to produce the D in the middle of bass clef. Tune your open D string to match this pitch.
The D string fretted on the fifth fret will produce the G needed to tune the G string.
The G string fretted on the fourth fret will produce the B needed to tune the B string. Note here, that all other strings have been fretted on the fifth fret, but that this is the exception, and is fretted on the fourth fret.
Finally, the B string on the fifth fret will produce the E necessary to tune the high E string.
Again, remember that it may be necessary to tune twice in order to arrive at a clean tuning.
Practice tuning your guitar, both to the piano, and to itself; both methods are valuable. Once it is tuned, give each peg a gentle twist in a random direction to mess it all up, and try again! Spend a few days just practicing tuning over and over again. Once you can consistently and swiftly arrive at a decently tuned guitar, begin messing around. Have some fun, practice fretting notes cleanly, and plucking them with the first two fingers and/or thumb of the right hand. Attempt some melodies, play some notes simultaneously, try to get a feel for the guitar, and a sense of how it responds to various pressures and angles.'
We will get heavily into proper technique and effective practice routines in later lessons, but for now try to enjoy and explore the guitar, without the rigor, rules, and restrictions imposed by "correct" practices.